A lot of really cool folks like François Vergès and Gjermund Raaen have been using the Nano as an 802.11ax capture tool, as have I. Let me show you what I’ve been doing to make my captures a bit easier. This method is Mac/Linux oriented but I’m confident it should be easy to do with the Windows Subsystem for Linux. I’ll be sorting out those details shortly.
Step 1 – XQuartz
So no matter which Linux GUI you use it can trace its roots back to X11 and believe it or not when MacOS X first came out it had native X11 support. That has fallen by the wayside but it can still be yours thanks to the XQuartz project. So go to the XQuartz site, download XQuartz, and that gives you an X11 server. Yay!
By the way – if Linux is your desktop of choice then you already have an X11 server, but you also probably already knew that.
Step 2 – Connect to the Nano
As I mentioned in my original post, I power the Nano via the DC barrel connector because it allows 10 watt operation, which is a nice chunk of power. But did you know that the mini port still works while the DC jack power is used? It doesn’t work as a host port but it works just great as a device port. If you plug it in to your Mac you should see something like this:
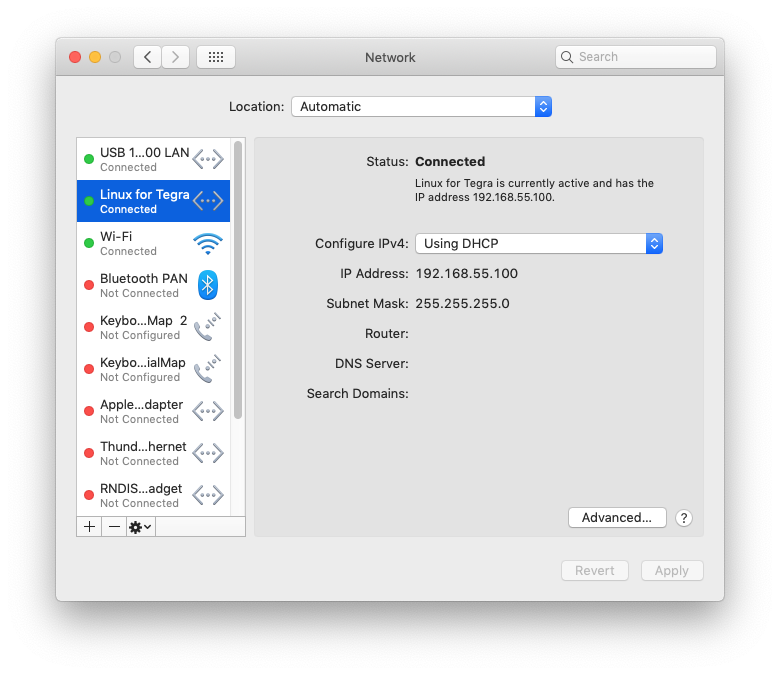
Yep, it works as an RNDIS device, very similar to what you see with the WLAN Pi if you have one of those (and you should). By the way, “Linux for Tegra” is the official name of the OS running on the Nano. If you ever see “L4T” references, that is what it means. In fact, if you look at the output of “ifconfig -a” on the Nano with the USB connected you should see:
l4tbr0: flags=4163  mtu 1500
         inet 192.168.55.1  netmask 255.255.255.0  broadcast 192.168.55.255
         inet6 fe80::888f:b1ff:fe03:995  prefixlen 64  scopeid 0x20
         inet6 fe80::1  prefixlen 128  scopeid 0x20
         ether 8a:8f:b1:03:09:95  txqueuelen 1000  (Ethernet)
         RX packets 530143  bytes 57724608 (57.7 MB)
         RX errors 0  dropped 0  overruns 0  frame 0
         TX packets 1888782  bytes 2613988298 (2.6 GB)
         TX errors 0  dropped 0 overruns 0  carrier 0  collisions 0
On the WLAN Pi it’s USBO:, but here it’s lt4br0. (I keep seeing L4T BRO!, and the developers just laugh at me.) And with it you can connect to your Nano via SSH by to 192.168.55.1.
However, before you SSH in you should make sure your SSH config includes X-Forwarding. So in your config file, located at ~/.ssh/config you should add a couple of lines:
    ForwardX11 yes
    XAuthLocation /usr/X11/bin/xauth
Step 3: Install Wireshark
Now you want to make sure Wireshark is installed. François has great instructions on his blog – here are the most relevant bits for us at this moment:
// Install Wireshark (development version)
 sudo add-apt-repository ppa:wireshark-dev/stable
 sudo add-apt-repository ppa:dreibh/ppa
 sudo apt update
 sudo apt -y install wireshark
 sudo apt -y install wireshark-qt
 // Install aircrack-ng
 sudo apt -y install aircrack-ng
 // Install tcmpdump
 sudo apt -y intall tcpdump
 // Allow the user to be able to use tcmpdump over an SSH connection (remote connection)
 sudo groupadd pcap
 sudo usermod -a -G pcap $USER
 sudo chgrp pcap /usr/sbin/tcpdump
 sudo chmod 750 /usr/sbin/tcpdump
 sudo setcap cap_net_raw,cap_net_admin=eip /usr/sbin/tcpdump
Step 4: Monitor Interface
I haven’t found a way around this yet, but what you need to do is use airmon to get the interface into monitor mode. So open a terminal on your Mac and ssh in to the nano:
$ sudo airmon-ng start wlan0 140


 Found 5 processes that could cause trouble.
 If airodump-ng, aireplay-ng or airtun-ng stops working after
 a short period of time, you may want to run 'airmon-ng check kill'


   PID Name
  3810 avahi-daemon
  3890 avahi-daemon
  4002 NetworkManager
  4058 wpa_supplicant
  9230 dhclient


 PHY     Interface       Driver          Chipset


 phy0    wlan0           iwlwifi         Intel Corporation Device 2723 (rev 1a)


                 (mac80211 monitor mode vif enabled for [phy0]wlan0 on [phy0]wlan0mon)
                 (mac80211 station mode vif disabled for [phy0]wlan0)
All that looks scary, but I haven’t had problems yet. Now you’ll see we’ve chosen a channel on the CLI, but don’t worry – we can change it.
Step 5: Start Wireshark
sudo wireshark
Simple as that. If things are working correctly you should see something like:
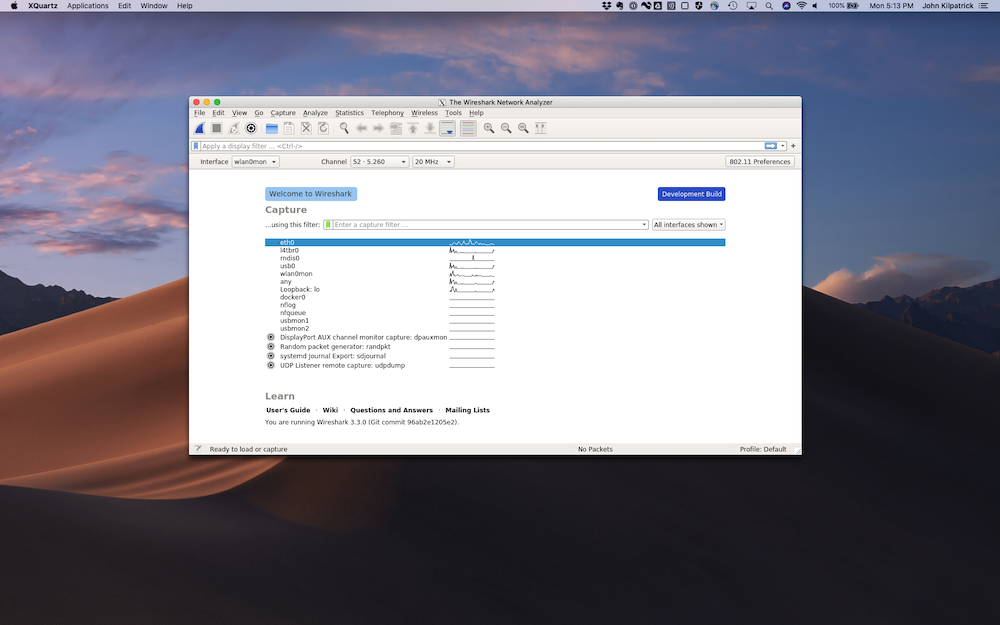
That copy of Wireshark is running on the Nano, being displayed on your Mac, and sent over USB. Select the wlan0mon interface and it will start capturing. Also of note, if you go to View -> Wireless Toolbar you can now configure the channel number and width which is a bit easier than doing via CLI. This functionality is appearing to work well – I went hopping around on a few channels and verified I was seeing the BSSIDs I expected to see.
Keep in mind – this application is running on the Nano directly. So if you want your coloring rules to work you need to copy them over. (Thanks Joel!)
That’s pretty much it. For those of you using the Nano as an 802.11ax capture and analysis tool I thank you – maybe this will be a bit easier for some folks. I know it’s coming in handy in my lab.