Introducing nanoax

I’ve been rather thrilled that my little “here, do this silly thing with the Nano” idea seems to have worked well for a bunch of folks. Thank you to everyone for their feedback and interest as we all excitedly dive in to this new protocol.

I think it goes without saying that the Wlan Pi is an amazing tool for network engineers. I’ve got one and I love it. And I’ve been wondering – could I do something similar? And possibly make the Nano easier for new users to to get right to the fun part, which is the 802.11ax stuff?

My answer is: The nanoax image.

I’ve taken the standard Nano image (release 4.2.3 as of this writing) and done the following:

  • Updated all of the pre-installed packages (duh)
  • Installed the AX200 drivers
  • Updated Docker to something more recent
  • Downloaded the version of the libretest container I built for the Nano (jakichan/speedtest)
  • Installed Wireshark and other capture tools like Francois did, and I also hid the Eye PA coloring rules in the image.
  • Compiled Kismet – it now works with the AX200.

I will note, this isn’t *quite* like the WLAN Pi image. It still installs somewhat like the default Nano image. (A couple of minor steps are different from the “stock” image that you may notice if you look closely.) You still have to accept the EULA, you get to choose your username and password, configure a timezone, etc.

I’m still working on all the documentation, but for now you should be able to download the image here. By the time this goes live the people in the OFDMA deep dive should have been banging on it for a day or two. I’ll be working on the documentation (I guess I need a cool logo), but in the mean time give it a try and let me know if you have any suggestions.

RNDIS/SSH/X11 fun with Windows

In an earlier post I covered my favorite way to access the Nano via SSH over the USB mini port. And I covered what Mac users need to do to remotely display the Wireshark GUI. But not everyone is a Mac user (I CAN’T EVEN) so what is a Windows user to do? I got you fam.

Step 1: Get an X11 Server

There are a few options, and I can’t speak to all of them. There is Xming and it’s been around the longest as far as I know. It has free and pay versions, but the free version hasn’t really been updated in a while. Cygwin/X is part of the Cygwin package, and that may be a viable option, but with WSL these days I don’t really use Cygwin anymore. (Side note, you’ll note that WSL is *not* part of the solution I’m presenting. I thought it would be easily done that way, but turns out…not. WSL is not really Linux, and that became an issue. I’m not saying it can’t be done, but it was more work than I wanted to do. But for SSH/SCP/etc without X11 it works great.)

I ended up choosing VcXsrv. And to be honest, it “just worked”. Download that and install. Be sure to start it before proceeding.

Step 2: Install PuTTY

Ok, this may seem redundant – I’m pretty sure 99% of network engineers with Windows laptops have PuTTY installed, but in the off chance that you’t don’t have it installed…go do that.

Step 3: Configure networking

At this time, you want to use a USB-micro to USB-A cable and plug that in to the USB-mini port on the Nano and to your laptop. You *should* end up seeing a new network interface. It should look something like:

You may also see some messages about preparing “Linux for Tegra” for use. It may also not be Ethernet 2 depending on your system, but the Remote NDIS part is what to look for. In theory you should have IP connectivity, but in at least once case I was seeing some…oddness…with the DHCP server on the Nano, so I highly recommend you configure a static address on this interface. Anything in 192.168.55.0/24 will work, just don’t use .1. (That’s what the Nano uses.) I’m not going to go over how to statically configure a Windows network interface here, though.

Step 4: Configure display forwarding in PuTTY

Configure a PuTTY session for the Nano. You’ll be SSHing to 192.168.55.1:

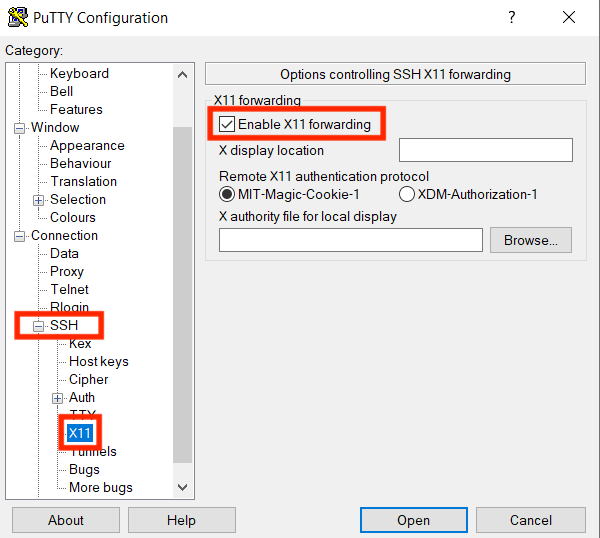
and enable X11 forwarding. Scroll down on the left and it’s under Connection, SSH, X11.

Now SSH to the Nano and log in.

Step 5: Run Wireshark

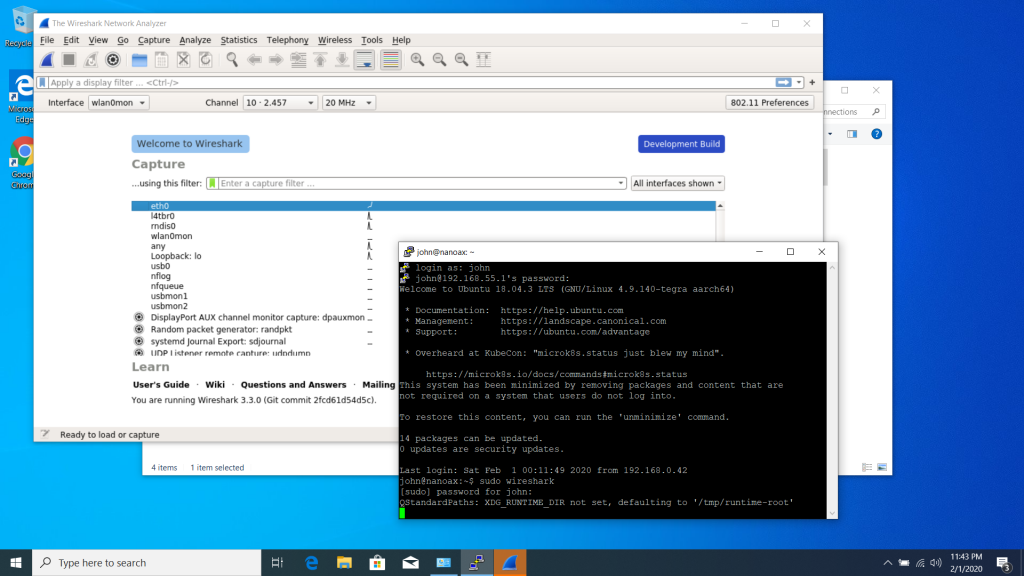
At this point proceed to Step 3 of my previous post (Nano packet captures using the Wireshark GUI) and it’s all the same. Install wireshark and when you run it you should get something like:

Enjoy!