I need to start this guide off with a few disclaimers: I do work for NVIDIA. And while I’m a decent enough wireless engineer, I’m certainly not an expert on exactly how our embedded products work (but I do know where those experts sit). This is also not a sponsored post – I paid for all of the hardware involved except for the NIC (we don’t get a discount – no free 2080Tis for anyone). But I honestly think the Nano is a great little maker board and this has been a really fun project.
Also, this was certainly a team effort with my friend Robert Boardman. Disclaimers for him: He works for Mist. No, Mist didn’t sponsor this. No, Robert will not buy you a 3D printer. (I already asked, he’s got quite a few of them.) For my Cisco friends who are likely reading this: Relax, we’re just friends.
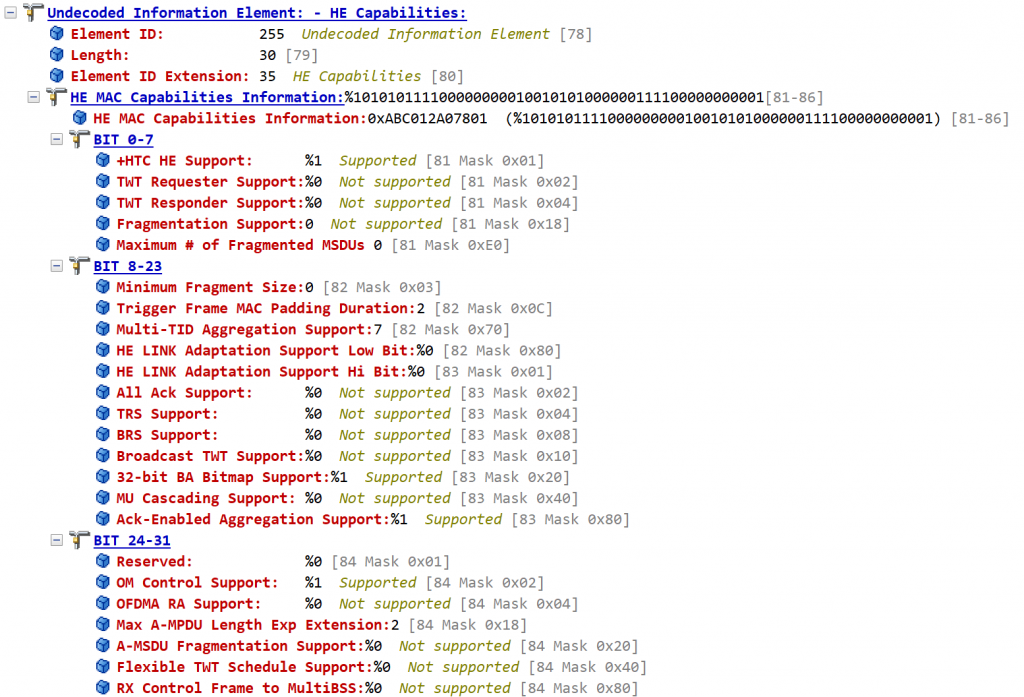
I know that some of us right now have 802.11ax-capable APs (we’ll leave ‘Wi-Fi 6’ for another day). But having APs with no clients isn’t fun, and for testing (and fun) having a real AX client or two is awesome. If you get two of them you have a chance of seeing OFDMA over the air.
At the moment you can get the Galaxy S10, which is pretty expensive, or you can get an AX200 from Intel and stick it in a laptop. That’s also a thing. But when I saw how the Jetson Nano has an M.2 slot it got me thinking. The 8265 works well with it but we wondered about getting the AX200 to work. Turns out it was pretty easy.
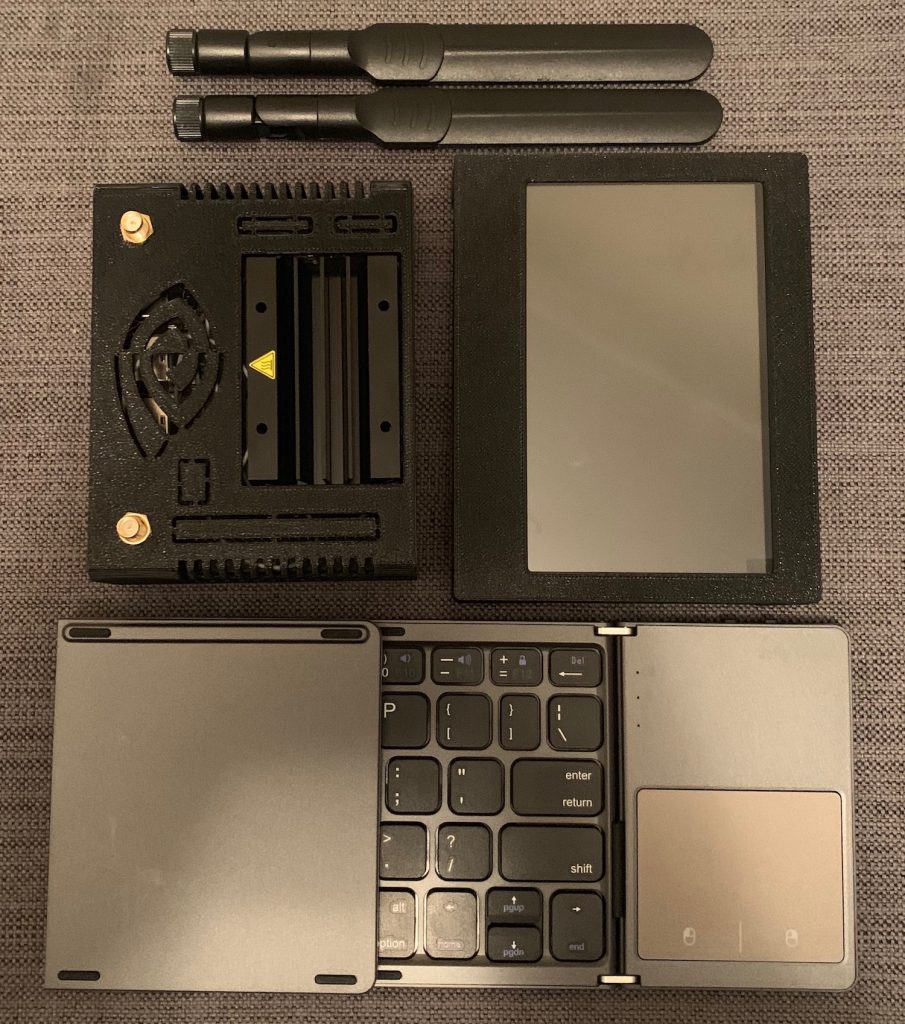
Now we think that list is just the bare minimum. Since our goal was to create a portable AX200 client/sniffer we wanted to have input/output solutions so we also recommend:
Without the keyboard and monitor the BOM is at $185.45. With the keyboard and monitor it’s $265.43. All prices are without tax and shipping.
Getting Started
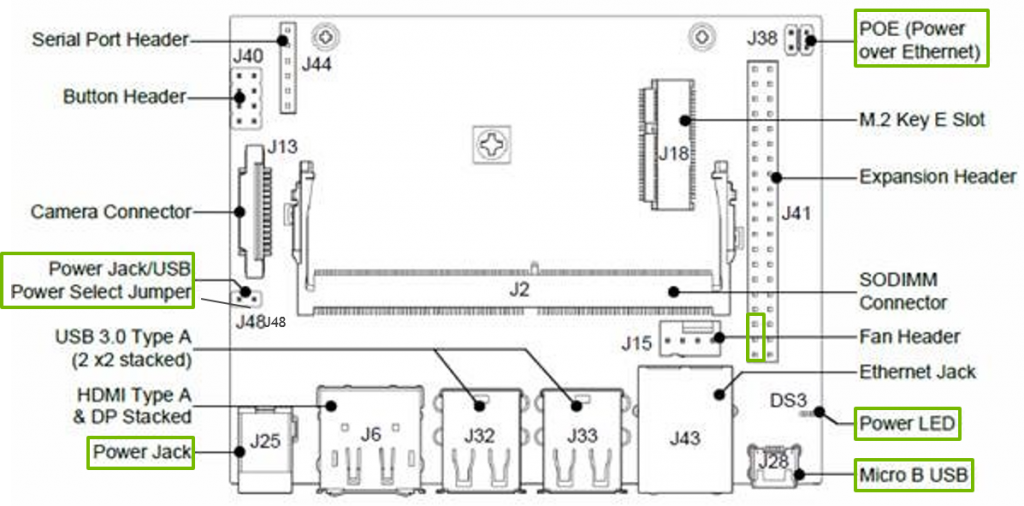
The Jetson Nano can be powered by a 5V 2A USB power supply, but we used the 5V 4A barrel jack option. The reason that the jumper bag is on the list is that you do need to connect jumper J48 for the DC power input to work. So first thing, bridge the J48 jumper. It’s on the left side of this diagram towards the middle, below the camera connector:
If you go through the official NVIDIA getting started guide, you’ll note that the Nano can be powered by USB. However, in the testing that Robert and I did, the Nano is much happier when being used as a desktop if it has full power. You can find a discussion about the usage of DC power here. Also, with the DC power option we were able to plug the USB of the monitor into the Nano to get power – powering the Nano via USB the monitor was unhappy. As a side bonus, powering the monitor from the Nano makes it a touchscreen. And it eliminates the need for two plugs.
Next, you’re going to want to prepare the SD Card. Download the image and use Etcher to write it to the SD card. If you’ve never done it before NVIDIA has pretty good instructions on how to do it for folks on Linux, Mac, and Windows.
Now it’s time to install the AX200. This is best explained via video and I think this one does a pretty good job. As Wi-Fi engineers we all know that the antenna connectors are a challenge. The antennas are from NVIDIA’s open source robot Kaya, but the 35cm cables are a bit long. I’m on the lookout for an antenna package with a shorter cable option.
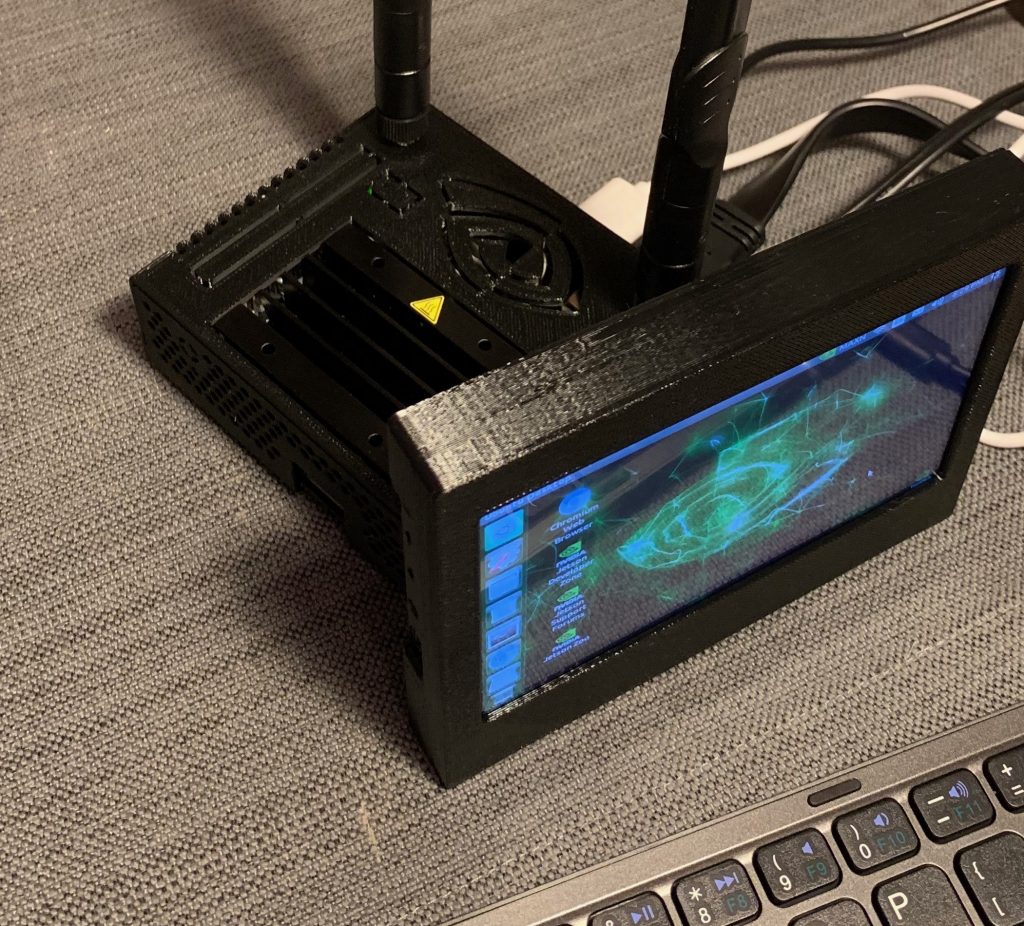
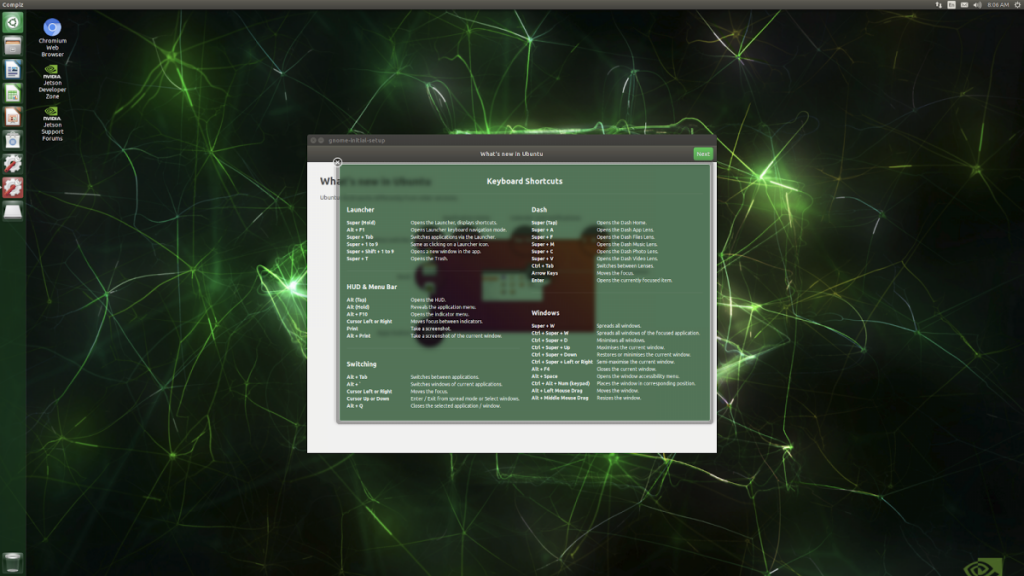
Now you’re ready to boot everything up! Connect the USB from your keyboard/mouse to the USB ports, connect the HDMI and USB to the monitor, wired ethernet, and power. Next thing you know you’ll should be at this screen:
Now that you’ve logged in you will probably note that there’s no sign that the Nano sees the AX200. What you’ll want to do is to build the core45 release of the iwlwifi driver that you can find here. Here are the commands:
git clone --single-branch --branch release/core45 https://git.kernel.org/pub/scm/linux/kernel/git/iwlwifi/backport-iwlwifi.git
cd backport-iwlwifi/
make defconfig-iwlwifi-public
sed -i 's/CPTCFG_IWLMVM_VENDOR_CMDS=y/# CPTCFG_IWLMVM_VENDOR_CMDS is not set/' .config
make -j4
sudo make install
Now that the iwlwifi driver is up to date and installed, it’s a good idea to install the latest firmware for the ax200.
Once both the driver and the firmware are installed then reboot the Nano and you should be up and running.
Just in case…
This is all great, but you have to admit that it’s a bit unwieldy. If you happen to be able to do 3d printing (or, in my case, know a master 3d printer such as Robert) there are some nice case options for both the Nano and that monitor. We are currently using this case for the Jetson Nano (note: Don’t try to use the antenna holes on the panel with all the connectors – it will block the DC jack). Robert also printed this case for the monitor and it’s pretty nice. He has some interesting ideas on how to perhaps modify these designs to make things a bit more functional.
Do you even ax bro?
Why yes. Yes we do.
So what now?
At this point we have an 802.11ax client for around $200 (give or take). Up next:
Taking packet captures from the CLI and Wireshark
Performance testing using iperf3 and IxChariot
General ax hacking
What would you like to see? Feel free to leave a comment below.
If you’ve been fortunate enough to deploy Arista in the datacenter you’re probably a fan. I certainly am. What’s not to love? They’ve got great hardware, the OS is super consistent, they do great DWDM, and CloudVision (CVP) has gotten to be pretty decent as an automation system and VxLAN controller. (I’ve seen datacenters come up in about 6 minutes or so, once all the patching is done. That’s full config, up and passing traffic. You’re not gonna get much better unless you write your own orchestration system.)
My only complaint with Arista has been a lack of love, on their part, for the campus. I’ve been asking them for about 5 years or so for two things: PoE and 802.1x. Once Arista acquired Mojo Networks it became clear that they wanted to expand into campus networking, so it should shock no one that they have been working on what I think of as a “campus feature set” for a while, and the first products in that line are now out in the open. It’s been quite a while since we’ve had a new contender in the campus switching space and I find it exciting.
One of the reasons I’m excited by this development is the approach that Arista has taken in terms of software. There is no code fork. These switches are running off of the same EOS code base as their datacenter leaf and spine switches. They come with all the datacenter features you love, especially all that VxLAN/EVPN goodness. This is really important because other vendors seem to have forked or re-written their SDN stack for campus and sometimes that leads to growing pains. Here you have a battle-proven SDN stack. I do see applications for SDN in the campus at an architectural level but at an engineering level I haven’t seen an implementation I like yet.
Disclaimer: As a function of $DayJob I am under NDA with Arista, so my comments will solely be based upon what’s been publicly released on their website, which you can find here. (Sorting out what I know that’s public and private is just too much stress.) I am participating in their EFT for these switches and have been playing with mine for about a week. I also am a bit of an Arista fanboi. (I love my Cisco friends too. Everyone play nice.)
Before we dive in to specs a couple of notes:
Just like with all PoE switches you have a choice between max power and redundancy. Based on the folks I’ve spoken to at Arista, the 720XP has available PSUs that can more than drive all ports concurrently, up to about 1800W. This is comparable to what the Catalyst 9300 series from Cisco offers. I find the published spec sheets a bit confusing in that regard and I think the data sheets will get updated in the future to make it clear.
Also, you’re going to see that all of the uplinks on these switches are 25G or 100G. I know that to some network engineers that focus on campus environments these port speeds may be unfamiliar. In today’s campus 10G and 40G ports are common but the 40G port is really just 4 “lanes” of 10G. This is the same thing – 100G is 4 lanes of 25G. This jump from 10 to 25 is based around the design of a 28Gbps SerDes (Serializer/Deserializer) – you just lose a bit of the 28Gbps in overhead, and you end up with 25Gbps of payload. But don’t sweat it, all of the 25G SFP+ ports can take 10G SFPs.
There are 4 switches in the 720XP line – here’s a quick summary.
720XP-24Y6 and 720XP-48Y6 start with 24 or 48 1G PoE ports and 6 25G uplinks. All of the ports provide 802.3at (30W) power.
720XP-24ZY4 has 16 2.5G 30W ports, 8 5G 802.3bt (60W) ports, and 4 25G uplinks. This is what Arista gave me as part of their EFT so my hands on comments with specifically apply to this model.
720XP-48ZC2 is the big daddy with 40 2.5G 30W ports, 8 5G 60W ports, 4 25G uplinks and 2 100G uplinks.
When comparing features and what not I think these switches are best compared to Cisco’s Catalyst 9300 offering. Before we get in to dueling spec sheets, I will note that the Arista switches don’t stack. Arista is staying true to their spine-leaf architecture here (and you don’t stack in spine-leaf). That may seem like a management challenge, but keep in mind that automation scales to solve this problem. (If you’re deploying Catalyst 9000 you’ll be encouraged to deploy DNA Center, and with Arista you’ll be similarly encouraged to deploy CloudVision.) So in the following comparisons we’ll only be looking at single-switch performance.
By the way, these comparisons are based off of spec sheets, not any lab testing I have done. You can find the Arista spec sheets here and the Cisco spec sheets here. Also, Cisco seems to be counting “switching capacity” a bit differently than Arista. With the Arista switches if you add up all the ports the switching capacity matches the port capacities. With Cisco if you add up all the ports then the switching capacity is 2x the port capacity. So let’s just all agree that all switches in this comparison offer “line-rate switching”. The actual switching fabrics inside the boxes exceed the port capabilities.
720XP-24Y6
C9300-24P
720XP-48Y6
C9300-48P
Switching
174 Gbps
208 Gbps
198 Gbps
256 Gbps
Forwarding
259 Mpps
155 Mpps
295 Mpps
190 Mpps
The 24Y6 and the 48Y6 compare pretty directly to the C9300-24P and C9300-48P. Cisco does offer modular uplinks, but the best option they have is 2x40Gbe. They also have 2×25 Gbe. The Arista version has 6×25 Gbe. (However, given that these are all 24 or 48 port 1G PoE switches, more than 50Gbps of uplink is a bit of overkill.) All of these switches are “non-blocking”, in that there’s both enough backplane capacity to support all ports and enough “northbound” capacity for all ports. Arista, however, provides a pretty solid edge in forwarding.
720XP-24ZY4
C9300-24UX
720XP-48ZC2
C9300-48UXM
Switching
180 Gbps
640 Gbps
560 Gbps
580 Gbps
Forwarding
268 Mpps
476.19 Mpps
655Mpps
431.54 Mpps
From here on out things get a bit more fuzzy. It’s harder to make “apples to apples” comparisons due to differing port configurations and capacities.
The C9300-24UX has some significant advantages over the 24ZY4. All of the 24UXs ports are 1G/2.5G/5G/10G and 60W capable. The 24ZY4 has a mix of 2.5 and 5G, and a mix of 30W and 60W. However, I will note that while the 24UX has the backplane capacity to switch all ports it lacks the uplink capacity to forward all 24 of it’s copper ports if they’re running at 10G. In fact it’s uplinks are oversubscribed by 3 to 1.
The 48ZC2 and the 48UXM are not the same but they’re a closer comparison. The 48UXM has 36 2.5G ports, and 12 “Multigigabit” (1/2.5/5/10) ports. All ports are 60W capable (but it can only do 30 60W ports). The 48ZC2 has 40 2.5G 30W ports and 8 2.5G/5G 60W ports. Since it doesn’t have as many 60W ports it can always power all ports. (The 48UMX could power the same configuration.) But again we’re limited by the uplink choices. The 48UXM will be trying to shove 210Gbps of traffic from the copper ports through an 80Gbps pipe, or about a 2.625:1 oversubscription. With the 48ZC2 it depends on how you look at those 4×25 ports. It starts with 140Gbps of copper ports. If you use the 4 25G ports as client ports and the 100G as uplinks then you’re 1.2:1 over subscribed. If you only use 2 of the 25G ports for clients and 2 as uplinks (along with the 100G) you’re back to 1:1.
So before folks get out their pitchforks allow me to acknowledge: the campus is not the datacenter. Do you *need* your switches to be non-blocking? Probably not. However, when comparing product lines from two different vendors it’s nice to be able to objectively compare specifications. It may not be important to you that your uplinks aren’t oversubscribed, but it’s interesting that they can be.
One of the things I think about when designing a large-ish campus network is if I want a separate switch fabric for APs or not. On the one hand, life is simpler when you have fewer switches and a unified topology. On the other hand, isolating your APs from the user switch fabric can have it’s advantages. And if you don’t have huge PoE requirements (like, say, you don’t have desk phones) then you may be able to limit your PoE to separate switches.
Right now with PoE switches we’re seeing a move from 802.11at to 802.11bt. How much PoE are we going to actually need going forward? If we look at how the 802.11ax APs are shaping up we can note a few things:
The 8×8:8 APs, with all features on, need 802.3bt power. The Cisco 9117 can run on an 802.3at port, but you lose the USB function. The Aruba AP-555 has to downgrade the 8×8 to 4×4 on single 802.3at power *and* kills the USB (although it does offer you the option to plug both Ethernet ports in to 802.3at power and get full functionality that way). They also both come with 5G ethernet.
The 4×4:4 APs are a bit more forgiving. The Cisco 9120 and the Aruba AP-535 lose the USB port on 802.3at but otherwise survive just fine on 30W. It’s interesting that the AP-535 has a 5G port while the 9120 has a 2.5G port. (Not sure WHY it has a 5G port, I don’t think it needs it.) They both can use 802.3bt and need it for “full functionality”, but if you power them with 802.3at you won’t really be missing anything. The only thing I’ve used the USB for on an AP is to add BLE to APs that don’t have it natively.
Edit: I am somewhat glossing over all the possible AP configurations. As Stephen Cooper pointed out to me, the Cisco APs (and most of them vendors, to be honest) can run on 802.3af power, just with reduced transmit chains. And Scott Lester reminded me, the Aruba AP-555 has Intelligent Power Monitoring to dynamically adjust it’s features based on the provided power. The point of this article isn’t to deep dive on AP power management, but rather to provide a broad overview of what the current landscape looks like when it comes to AP power consumption.
(Yes, Arista C-250, I see you there. But your spec sheet doesn’t help me here because it says it can operate on 802.3at power with “reduced function” without telling me what I’m giving up. You’re an 8×8:8 AP, so I assume that you fall back to 4×4:4 but your spec sheet is missing that data.)
So here’s my take on these switches in light of what the next generation of APs are looking like. Cisco can deliver a lot more 60W ports. If you’re deploying 8×8:8 APs, or using any optional features that require more power (like the USB port) then you need to take that in to account. If you’re deploying mostly 4×4 APs then you’re a bit more free in your choices.
The 24ZY4 could handle a mix of 4×4 and 8×8 APs, as could the 48ZC2. I’m just not sure if I’m going to be mixing and matching APs like that. The 24UX is fine as well, because if you run all the copper ports at 5G you’re much less oversubscribed, and if you’re running them at 2.5G then you’re not even oversubscribed at all. Wi-Fi isn’t likely to run ports at full line rate, so in my mind the 24UX is a really solid choice for “AP switch”. I’d probably choose the 48ZC2 over the 48UXM simply due to the uplink options.
I will note the existence of the C9300-48UN. It’s got 48 ports of 5G/2.5G/1G and they’re all 60W capable, although again you’re still limited to being only able to power up to 30 of them at 60W. If you need 5G then you need 60W, since the only way you truly need 5G is if you have 8×8 APs.
This is Arista’s first set of offerings in the campus switch portfolio. I’m sure it won’t be their last. For now I’m going to play with my EFT sample and let folks know what I find. If you have questions or want me to try something, let me know!
If I think about what I like about Wi-Fi as a networking discipline I would say that it’s how layers 1 and 2 in our domain are so interesting. 802.11 is a fascinating protocol to study and we also get to practice RF engineering. I might be known to, from time to time, tease my datacenter teammates about how “cute” it is that their signals go through these copper wires and how it’s all deterministic and stuff. Must be nice…but I digress.
One of the more contentious areas of debate (see what I did there?) is regarding how we manage our RF space. There’s a contingent that advocates static channel and power is the way to go. And then there are vendors with their Radio Resource Management (RRM) algorithms, and some of us do use those. I use RRM, even if sometimes it needs to be slapped upside the head.
(Side note: Because I started my Wi-Fi journey in an Aruba environment I thought that “RRM” was a Cisco-specific name especially since Aruba called it “ARM” at the time (and now AirMatch) but it turns out that RRM is really a generic term. I mean there’s even a Wikipedia entry about it.)
Neither side is wrong – both approaches have their benefits. At the end of the day we’re all trying to accomplish the same thing – we’re trying to provide a great user experience and that requires your RF to be clean. But what does clean really mean? And how clean is clean enough?
When I started my current job I was tasked with choosing 3 Wi-Fi Key Performance Indicators (KPIs – a very “enterprise” sort of thing) to have on a dashboard. What were the 3 metrics that I thought would be the most important to represent to the Wi-Fi user experience? That was quite a challenge, and one that I don’t feel I’ve fully resolved even 2+ years later. I knew one that I wanted was average client MCS Index, but I also didn’t have a way to get it from my mostly-Windows fleet. And I still don’t. I do track and graph average client SNR. It’s not perfect, but it is readily available. (The other two metrics are AP Uptime and average clients per AP, by the way.) So one way I’m managing and judging my RF performance is based on the metrics I had access to, even if they weren’t the right ones.
So we come to the meat of something that’s been in my head a while: with all the time we spend worrying about and managing and designing RF how do we correlate that RF performance to user experience? Are we focusing on the right things? We have a lot of metrics about RF performance, but do they really help us improve the user experience?
If you were expecting an answer to the question I’m going to have to disappoint you. I don’t have one. I’m more proposing a topic for debate. But here’s why I’m thinking about this out loud: I think we spend a lot of time focusing on RF stats because we can get them, look at them, and understand what they mean. We are assuming the impact they have on user experience based on our understanding of the protocol and our own experiences but I don’t think there’s enough data out there to prove those assumptions.
Let’s take channel utilization as an example. It’s a GREAT set of RF metrics. You can look at AP duty cycle, how much time the channel is in use by other APs and their clients to see what the impact of CCI is, and yet no one can give me a data-derived value for what an acceptable level of channel utilization is. I understand that so much of Wi-Fi is more art than science, which is to say that it’s experience based, and so there may be no way to have a universal value.
I don’t want to sound like I “don’t believe in RF tuning” or something crazy like that. RF performance absolutely matters. If you let anyone’s RRM run with out of the box settings you’re going to have a bad day. You’ll see all the radio stats be bad, and your users will be frustrated, and yes you absolutely need to adjust things. All those great RF stats will guide you and help you understand what you need to fix. As those numbers get better your users will be happier.
And let’s keep in mind that everyone’s radio resource management (RRM) algorithms are designed for the “common case” scenario. The less standard your physical space is – the further you move away from drop-ceiling office land – the more help those algorithms are going to need to achieve a good result. If your environment is completely insane (I’ve got a building like that) even the strongest advocate of RRM might say “I’m just gonna turn that off…”.
But it does make me wonder something. We can spend a lot of time tuning and dialing our RF in to be as close to perfect as we can get but what is the ROI on that effort? Where is the point of diminishing returns? What does “good enough” mean? And can we define “good enough” in a way that reduces (but doesn’t eliminate perhaps) the need for hand-tuning? Because I’m pretty sure that for a lot of engineers responsible for Wi-Fi in enterprise settings that sort of manual tuning just doesn’t scale.
This may be mostly a data science problem for the various Wi-Fi vendors. Can they extract enough data from the systems we have to infer what the user experience is and then tie that to the RF metrics they already have? I know that it’s what just about everyone is working on, given the number of analytics platforms I’m seeing these days.
Right now, whether it’s an algorithm or manually, we’re all managing our radios the same way – based on RF parameters whose impact on user experience is difficult to quantify. Sure, I can say “I changed AP foo from channel bar to channel baz and channel utilization decreased by X%”, but what can you tell me about how that change impacted the users? Can you tell me how that improved their experience? Was it disruptive?
I know these are very hard, perhaps almost impossible, questions to answer. But that doesn’t mean they aren’t the right questions to ask. Right now we manage what we can measure but does that lead to the best results? If we focus more on measuring the user experience then should that data influence how we manage our radios? And if we did that, what would happen? Feel free to share your thoughts on this!
The other day I was chatting with a co-worker and the conversation ended up turning to Wi-Fi and for some reason I ended up explaining what “dBi” meant, what an isotropic radiator was, and how antennas basically worked. At the end of the conversation he asked me where I had learned all that stuff – he was curious if it had been part of some Wi-Fi training I had undergone. He knew it wasn’t college because I make it clear to folks that my major was Computer Science – not EE or some hybrid. (And I work in a company with a lot of EEs.)
Nope, I told him. My training in RF fundamentals came from amateur radio.
Several years ago I was reading about the emergency response to the Loma Prieta earthquake and it included some recordings of amateur radio traffic. (I remember the Loma Prieta quake well – it was so powerful that it caused the light fixtures to sway all way in my parents’ home in Sacramento.) This lead to learning more about amateur radio and its role in disaster response. Living in the San Francisco Bay Area I’m well aware of the need to be ready. I have a disaster kit, I have non-perishable food stores, but this got me interested in being able to communicate in a disaster.
This story will be familiar to most “hams”. Disaster communications is sort of the gateway drug to amateur radio. It starts there, then you do your first Field Day and make your first DX contacts, and then you’re wondering if you have room in the back yard for a tower. You might fall in with a group of contesters and get that bug. They prey on your civic responsibility and then the next thing you know you’re hanging out at HRO Sunnyvale (RIP) thinking that the shiny radio isn’t THAT expensive…
But I digress.
Part of becoming an amateur radio operator is getting licensed. And the studying you do for that is a pretty good introduction to how radio waves work, how antennas work, and many of the other things that tend to be important in Wi-Fi. Yes, the frequencies are very different but all of the concepts carry over. Amateur radio is nice because it’s very “hands on”. You build and test things yourself, you find out what works and what doesn’t (and sometimes why). This mostly happens around the dark art of antenna building.
I was pretty far along in my career as a network engineer when I “fell into” Wi-Fi. And as I started doing more and more work in that area I became more aware of how much of a head start my amateur radio experience had given me. It’s not only a fun hobby (with lots of cool toys) but it’s also provides a lot of very valuable professional education for wireless network engineers. And as a side bonus it will help with your qualifications for a CWNE certification!
Studying for an Amateur Radio license in the US is pretty easy. There are 3 different classes of license: Technician, General, and Extra. As you get licensed for a more advanced class you get access to more and more spectrum that you can use to try and talk to folks. The question pools are all public so there should be no surprises on the exam. I used HamTestOnline as a study tool back when I was getting licensed.
If you want to get started look for a local radio club. They have been, in my experience, very welcoming to new people who are interested in the hobby and mentoring is part of that. A good resource for finding a club is the ARRL Club Finder. You’ll be able to find out about testing opportunities as well as club events where you can get a chance to operate and practice without having to invest in equipment yourself. It can’t get any easier than that.
If you haven’t visited in a while you may have noticed that things look…different. Clearly, content creation hasn’t been a priority since, uh, 2013. (If you’re one of my compatriots from the WLAN professional community you very well may never have been here before.) In fact, at one point during some system maintenance I broken Movable Type so badly that I couldn’t even make a new post if I wanted to.
One of the interesting thing about the WLAN professional community is that blogging and social media participation is a thing that one does. And so if I want to be a participating member of this community (which I do) I needed to revive my blogging platform. I know it would have been easy to just pay WordPress for hosting, but I figured I’d see if I could get things set up myself. And not only did I repair my MT install enough to extract the older content, but I also got WordPress up and running just fine. Oh, and now running a supported version of FreeBSD which seemed like a good idea.
I’m fairly impressed by WordPress. This is a “stock” theme and it suits my personal design preferences quite well. It’s a pretty impressive tool, but I’m sure I’m doing this all wrong. But a learning experience never hurts.
Looking at that older content I’m not really sure if I want to keep it up or not. But I have done a few things to allow folks to narrow down what they look at:
Any Wi-Fi related content will be categorized as such, and be visible at Hypergeek Wi-Fi so if you’re only here for the Wi-Fi content feel free to use that URL.
Personal content can be found at personal.hypergeek.net. That’s where all the old content is at the moment, for example.
And, as always, you can just hit the main site to get the whole thing.
So feel free to let me know what you think. We’ll see what happens as the situation evolves.
No, it’s not what you think. I’m not smoking pot – get your mind out of the gutter!
This weekend I finally got in a training ride with a local group that I’ve chatted a lot with on Facebook – the South Bay Blaze. It just seemed like things always conspired to keep me from riding with them. Chris’ Distance Training rides are always a priority on the Saturdays that they occur, so anything that took me out of town had to happen on the off Saturdays. One thing or another meant that it wasn’t until the end of the season that I got in a good ride with this very social and fun training group.
A lot of this ride covered the area from my Sunday ride last weekend. We headed south along Blossom Hill until it turned into Santa Theresa – going in the opposite direction of the Slog. Yay! And we stayed on Santa Theresa until it turned into Hale and kept going until it dead ended on Main Street in Morgan Hill. Morgan Hill, it so happens, is where the headquarters of Specialized is. So my bike was “going home” so to speak.
We climbed up to Anderson Dam – a short but steep climb. It was at this time I started to hear a “ticking” noise. I figured out my wheel was flexing enough under the power I was putting out to cause the magnet from the speed sensor to hit the sensor arm. That got fixed. (And I have new stiff wheels on order anyway.) Lunch came after the dam – and after a couple of wrong turns. The route sheet was a bit…imprecise.
After a seafood wrap at Quiznos it was back to the same Coyote Creek Trail from last week. Something about that trail doesn’t agree with me. We kept going to the Hellyer Velodrome where I diagnosed a bit of a toe problem as being a sock issue. However, I’ve also been getting numbness in my big toe on my right foot that I need to figure out. After the velodrome and some great cookies we came home through Campbell and had a nice stop at a Starbucks exactly 10 miles from home. Something about the dryness and the wind was really making me tired. The last 10 miles were fine and I was glad to see the familiar corner of Fremont and Mary. I really enjoyed the ride and the group – there was a lot less pressure than the groups I’ve usually ridden with. It is something for me to keep in mind when I plan training for next year.
When I got home I figured out that perhaps using DuoDerm for saddle sores while riding isn’t a great idea. It had disintegrated into a sticky mess that I’m hoping comes out of my chamois in the wash. 🙁
As far as Sunday I had two options – an epic ride along the coast with the Awesome Ahead group – 85 miles and 5500+ feet of climbing. While I’m all for back-to-back riding (and including a quick ride on Friday this would be my third day in a row) I wasn’t up for that. So I showed up for what I thought was a renegade ride, but actually was an official training ride at only about 36 miles. A quick Portola Loop with some of my new friends from the Blaze. It was great and I really pushed on the way back to get my speed average up. 14.1mph over 36 miles is not bad at all. At our rest stop (Robert’s Market, natch) I happened run in to Chris, the leader of the Distance Training series. Hearing that this really hardcore guy also didn’t need to punish himself with the mega-climbing ride that I ducked out of made me feel like I had made the right decision.
This week I am meeting with Vanessa again to try and sort out some butt and foot issues. Hopefully those will get solved before Saturday, when I’m supposed to ride the 113 miles to Gilroy and back.
This is the time of year when the back-to-back rides become necessary, or so I’m told. You need to get your body used to the idea of riding in that not-so-fresh state. (Get your mind out of the gutter.) And as much as I love Princess Bob and the whole Awesome Ahead crew I knew that I wasn’t up for 80 miles on Sunday, so I saw a 40-mile “late starters” ride and decided to give it a go.
Unlike most of my rides the start point was rather far to the south, and given that I got up a bit late I was in a rush out the door. I made it to the start point 10 minutes after the meeting time but it turned out ok. The bad news what that I had left something at home – the headband that keeps the sweat out of my eyes. Todays ride convinced me that it is not really an optional bit of kit these days. The route was advertised as only having one climb of the day and mostly flat for the rest. Unfortunately there was no “Ride with GPS” link posted, so I couldn’t download the route onto my Garmin. This would be my first training ride without GPS assistance and just reading a route sheet.
We started off on a bit of bike trail. That time of day it was pretty empty. The climb up Bailey was ok – it’s a nice climb I guess. Coming down it was way more fun as I had done on an earlier ride. Up and over and done with climbing – or so I thought. I was a bit concerned at the bottom of the hill as the turn direction didn’t match up with the route sheet but one of the TRLs told me we were going in the right direction so that was good to hear. But then there were two more decent hills – so much for one climb only. Eventually there was a water stop near the reservoir. I got my bottle topped off by fabulous sag driver Jim. Sadly I was rocking plain water with Endurolyte caps today as I had run out of Skratch.
The next bit to lunch was fine. There were some flats where I got to sprint. I love getting up out of the saddle and winding up the bike to 20 mph. Eventually we were back in civilization and we stopped at a little shopping center. I got a Jamba Juice all fruit smoothie which was a great idea. Best rest stop food ever. Even though it had only been 20 miles I also re-applied the Chamois Butt’r. That’s important.
On the ride back my butt did really start to bother me. I think part of it was that while I had shrunk down into XL size shorts from Pearl Izumi I don’t think they fit me well. Not as well as the Specialized RBX bibs I wore yesterday. I was chaffing a bit at the edges. Also my butt in general was sore and cranky – the change in seating position seems to have aggravated things. I will be asking Vanessa if it’s something I will adjust to or if it means something else.
As we were heading east I was starting to get nervous. The route sheet said we had 3 more miles to go east and I was wondering if there were going to be some more unadvertised hills. But it turns out that the route sheet was just inaccurate and our north turn came a few miles early. Eventually we came back to the bike trail which wasn’t too busy and I was able to do some fast cruising. It looked like the mileage for the ride was going to come up about 4 miles short but the stretch on the bike path was longer than advertised. My truck came in to sight and I was done for the day.
When I’m far from home after a ride I do enjoy my truck as something to come back to. It has plenty of space for me to get organized. I cranked the tunes while trying a new flavor of Recoverite and oddly enough the citrus flavor was not as foul as the chocolate of yesterday. Thank jeebus for small favors. I stopped by the bike shop to pick up some more Skratch and to get another pair of RBX bibs ordered.
My legs didn’t feel too bad. I felt I could have ridden longer. It’s my backside that may be the limiting factor which concerns me. I’m not sure what I can do about it at this point, however.
Back in October of last year I rode in Foxy’s Fall Century. I had built it up into a major stress-filled event in my head. Could I do it? How could anyone ride 100 miles? Was I gonna crash and burn? Well, as you may remember, that did not happen. I had a decent time with my posse and made it out safe and secure. This year a century wasn’t a training goal. It was just another training ride. I tried not to even think about it. “Oh, yeah, just another century.” No big whoop. And…that’s pretty much how it happened. No big whoop.
The day started out in the dark and we (Tom and I) arrived at the start point on time – even a bit early. Tom was driving SAG today, but he was 1 of 2 SAG drivers. The other driver – a very experienced ALCer – gave him some tips. The usual pre-ride festivities and we were off!
The route started by going out and through Arastradero Preserve. I’ve had enough of that place, really. Yes, it’s pretty. And yes, it’s a good ride. But between the pre-Xmas rides and the early part of the year I’ve had enough. Really. The good news was that instead of turning left at Alpine and continuing the climb to Robert’s Market we got to go down Alpine, which was much more fun. A quick jog over to 84 and down towards the bridge and our first rest stop of the day. I realized there that I had lost my route sheet, but Andrew gave me one (which I hope was an extra). It turns out that I needed it later.
Thankfully the bridge was much less messed up than last time. They had fixed the bike path, so getting on and off the bridge was painless. The road after the bridge was as it always is – just the roughest, buzziest road you can think of. Given what the pro riders were going to be doing the next day (Paris-Roubaix) it seemed appropriate. And again I had that odd experience where my feed and hands were buzzing but my butt was not due to my magic seatpost. After that it was Mission Blvd. I remembered it from last time – mostly because a lot of it was a “false flat”. By the time I got to the second rest stop I was ready for a break.
The third leg was where things went a bit sideways. There were a couple of turns that were just not on the electronic cue sheet, and I missed them twice. I ended up doing about an extra mile. And given that once I realized it I had to go back uphill to get back on course I was not happy. I texted Tom to let him know, and he let the sweep TRL know that I was back on course. Also, once I got up with him Tom had let me know there was a bathroom about “a mile up the road”. Which was good, because I had to pee in the worst way. Unfortunately the mileage estimate was a bit off, and it was about 4 miles up. I was cranky about getting lost, getting me more behind, Garmin being lame, and a full bladder. This was not Happy John. Eventually the bathroom was found and there was much rejoicing. There was only about a mile and a half from there to lunch and it was with a nice downhill. I was in such a bad mood when I got to lunch that I gave in and had Panda Express.
The fourth leg had the only real climb of the day (although there had been plenty of climbing for me before this point). The hill was your basic sonofabitch, pretty much. I had to stop a few times on the way up when my HRM said I was north of 170 and I started to get shaky. I heard that last year the temperatures were north of 100. I have no idea how I could have even done it then. I was in pretty rough shape at this point. But we got up and over it and then the next challenge was the Santa Theresa Slog. 5 miles long, straight, headwinds, and just lameness. Again, it was survived.
At the last rest stop I was both feeling pretty good and a bit apprehensive. I knew we were gonna have the climb up that bit of Highway 9 and I never like that. It’s not a “real” climb, but it’s enough to be annoying. Andrew, the sweep for the last leg, gave me a nice head start. Once I was past that climb I knew we only had a mostly downhill 15 miles left. There was a quick climb up McClellan and then back down Foothill. The last part was really fun because the gentle downhill slope let me go 15mph + and feel strong. That is until the guy in the recumbent dusted us like we were standing still. Going up Shoreline we hit EVERY SINGLE LIGHT WRONG. So much for finishing in stellar fashion. I pulled into the lot with almost 102 miles on the odometer. Quite the day. I was glad enough to have finished that I wasn’t too annoyed with being last.
Today was a day for beverages. In my search for the best electrolyte solution for me I tried quite a few things. A few days before this ride I tried the Blackberry flavor from Osmo Nutrition but I didn’t like it. On this ride I tried their Orange flavor and that wasn’t great either. I also tried the Endurolytes Fizz from Hammer. They have many flavors, but the one I tried made me gag. I had to force myself to drink it. The one that was the hands-down winner was the Skratch Labs “Lemons and Limes” flavor. Super easy to drink. Not too heavy. I may very well go through the effort to bring enough of this on the ride for me to use all the time. They have a new fan! I have to admit, I had been hoping I’d like Osmo better – their beverage is closer in composition to what the Endurolytes capsules contain. But I figure that if the Skratch lets me stay mostly ahead of the electrolyte game then I can supplement with the caps when needed.
There were some other nutrition experiments today. Instead of bringing individual gel packs I used a flask from Hammer and filled it with my favorite flavor of Hammer Gel. I feel this works very well – the ease of use of the flask is worth being stuck with only one flavor of gel. I don’t know if this will work well for me on the ride or not – individual packs might work better then having to bring a big bottle. I’ll debate that internally. I also had their Recoverite beverage before getting in the car to go home – the chocolate was FOUL. That’s not gonna work well. I also ate one of their whey recovery bars. The bar was not quite as foul, but it’s not really good either. They have a lot of science to back up their claims, but I wouldn’t mind a better tasting replacement for either of them.
As the rides have been getting tougher the stress on my body has been getting greater. I have in the past had post-ride cramps that I’ve been trying to avoid. One thing I’ve figured out is that I haven’t been getting enough electrolytes. The ALC guidelines say that I should have 1 bottle with water and 1 bottle with electrolyte. What wasn’t clear is that is the MINIMUM. No reason not to have BOTH bottles with electrolyte solution. Yay.
I started off using Nuun. Easy to carry, it tasted ok. I had it one bottle. But I was trying to “balance” the plain water bottle vs the Nuun and that’s where I think my mistake was. If I keep using Nuun I plan to use it in both bottles and just drink a bottle until it’s done. That makes it easier for me to understand.
The next step was to use Hammer Endurolyte capsules. They said “1 cap per 50lb body weight per hour” as a base. That was easy enough. For me, rounding up, that was 5 caps per hour. I did that my last ride and felt ok. They also have a “Fizz” version which seems similar to Nuun that I have *not* tried.
My next step will be to try Skratch Labs. Vanessa, Cycling Goddess, loves it. It has a great rep. We’ll see.
But what do the numbers say? Well, let’s take the recommended numbers. The standard rule of thumb is 1 bottle of fluid per hour. What’s interesting is that it’s not body weight dependent. Maybe I need more? Here are the numbers comparing 1 bottle per hour at the recommended concentration vs. 5 Endurolyte caps.
Nuun
Serving size: 16oz prepared, 1 24oz bottle/hr
Nutrient
Per serving
Per hour
Sodium
360
540
Chloride
540
810
Potassium
100
150
Magnesium
25
37.5
Calcium
12.5
18.75
Skratch
Serving size: 8 oz prepared. 1 24 oz bottle/hr
Nutrient
Per serving
Per hour
Sodium
120mg
360
Chloride
180
540
Potassium
20
60
Calcium
20
60
Magnesium
16.8
50
Endurolytes Caps
Serving size: 1 Cap, 5 caps/hr
Nutrient
Per serving
Per hour
Sodium
40
200
Chloride
60
300
Calcium
50
250
Magnesium
25
125
Potassium
25
125
B6
6.6
33
Manganese
1.6
8
Endurolytes Fizz
Serving size: 16 oz prepared, 1 24oz bottle/hr
Nutrient
Per serving
Per hour
Sodium
200
300
Chloride
60
90
Calcium
100
150
Magnesium
50
75
Potassium
100
150
B6
13
19.5
Maganese
3
4.5
The numbers are interesting. The Endurolyte option is giving me less sodium but way more of everything else. They have a detailed article telling me why they have their mix the way they do, but it’s interesting that their fizzy version mixes things up differently. The one other variable is that the Skratch drink mix has 40 calories per serving, so that 1 bottle per hour would have 120 calories in it.
Then there is the issue of practicality. This is something I have to carry with me – none of these options will be found at ALC rest stops. Let’s say that I consume 1 bottle/hr minimum. On my first century it took 7.5 hrs – I’m gonna round that up to 8 hours moving time for a long day. The first two bottles of the day I could make at home (or in camp). So that’s 6 bottles over the course of the rest of the day. At 1.5 little envelopes per bottle that’s 9 envelopes of Skratch that I would have to carry with me. If I “went safe” and doubled up on Nuun and/or Endurolytes Fizz it would be 12 tablets (or 1 tube). It’s 40 caps of the regular Endurolytes which is fairly easy to carry in a small baggy. The Skratch Labs option is the least practical for sure.
I also haven’t hydrated with anything that involves real calories. I think I’m getting enough calories over the course of a ride but it’s uneven – I eat when stopped. Perhaps there is value in getting some calories in on a regular basis.
I haven’t tried drinking nothing but Nuun for a day. I know there are times where I’ve preferred the taste of water. I also haven’t tried the Endurolytes Fizz at all. I will be trying Skratch Labs on a short ride in the next day or two. I have done a ride where I drank plain water and took 5 caps every hour (when the “moving time” clock on my Garmin said so). That seemed to work ok, but like the un-even energy intake I wonder if it’s less than ideal.
I will say this – this all gets to be rather overwhelming, and it’s also rather individual. I’ve got about 2 months to try the combinations and find what works best for me. Hopefully I will be able to leverage the experience of others in addition to my own experiments.
One of the weird things about losing weight has been my feet. When I started this I asked my podiatrist if my feet would shrink, and he said no. I’d always be a “wide”. Well, while I was getting a bike fit done a while back my fitter, the Cycling Goddess Vanessa, said “Hey, I don’t think your feet are wide.” And she got me to try on the new Specialized S-Works shoe. Back then I didn’t think I was going to need new shoes, but boy were they comfy. And they look cool, don’t they?
As training wore on I thought about getting new shoes. Last week I was somewhat down to the wire – you can’t really make too many changes this close to the ride. I had to get all my “interface” things locked in before the ride. Training rides are gonna be at the 100 mile mark soon. That normally would be a crazy time to make changes, but I have two months to go.
The bad news was that the color I wanted (the all black pictured above) was out of stock. The shop did have the black and white in my size. I thought they would have to do and I made an appointment for Friday afternoon to get get them, put cleats on, make sure cleats were right, and to also check saddle height.
Let me digress to tell you a story about how awesome Vanessa is. She’s the manager at Cognition Cyclery, where I have bought the overwhelming majority of my bike stuff. She did my fit (she’s a certified Master BG Fitter, natch). She’s just way on top of things and talks about anatomy like a med student. It’s crazy. And she’s figured me out pretty well. I got there Friday and we discussed “Do I really need new shoes?” She thought it could go either way, but in the end I decided to go for it since I was concerned about a hotspot I had been getting on my big toe. After having decided that yeah, I was gonna do the shoes, she went to get them. And then she says that she didn’t want to say anything until I was sure I wanted new shoes, but something had arrived that very morning from Specialized…a pair of all-black S-Works 2013 shoes in my size. Yep, she didn’t tell me she had them until I was sure I wanted *any* shoe, since she wanted my decision to be not driven by my lust for matte black sexiness. Does she know me or what?
The only bad news here is the lesson I learned: After making any changes I should take a quick test run on my “usual” route before doing a big training ride. I was riding with a new (to me) ALC training group Saturday morning and I ran in to two problems. One was that I hadn’t made sure the float was set up right on the cleats on the new shoes. (New shoes – new cleats.) The other was that once again my seatpost had slipped. So 3 miles in to my training ride I had to limp (figuratively) back to the car and go back to the shop.
Fortunately the seatpost problem was finally fixed. It turns out that there wasn’t nearly enough carbon prep put on when it was installed. They actually use a cream that increases friction so that (in theory) you don’t have to clamp as hard. But every time I had used the seatpost it had slipped and this time it was enough to make me not want to ride. The shop took it out, checked it, and told me there was not nearly enough on there. I’m glad that they diagnosed the problem. Vanessa had put tape on the post the night before, so we knew it wasn’t my imagination. I went home and after playing with the float adjustment on the cleats I went for a short 15 mile ride and everything seemed fine. I am going to try and sneak in a longer ride this week with some climbing before the weekend, which should be the first century of the season.
The lesson: Don’t screw with the bike before a big training ride unless you have time for a short no-pressure run to make sure it’s working as you expect.